A little introduction
Well, I'm mainly here for sharing what I have(a bit knowledge ,nothing else like money etc :) ). The people always say that they have to try the so called Open source! but the actual problem comes when once they enter into it!. Some of them couldn't find anything better over there where as others don't find a way back to their pretty preserved Windows.Today, I'm going to explain about the heavenly solution for this - Oracle VM VirtualBox! I'm really support the GNU founder Richard Stallman, so that, this article contains free stuffs,including the article itself!.
I'm demonstrate you how you can install Ubuntu 12.04 LTS (Precise Pangolin) inside VirtualBox. I'm using Windows 7 professional as my host PC(this is not free in fact). The procedure is same for all the OS which you have to try with VirtualBox.
Pros and Cons
The advantages of using VirtualBox for your Linux is as follows:- You will get access to your Host PC's OS(say windows 7) as well as your virtualBox OS(say, Ubuntu) at the same time. This will give the flexibility to the user.
- Most of the Internet dongles comes with an .exe for the setup. But his will not help you to setting up the connection in Linux machines. In VirtualBox, you can select the bridge option so that the Host's network will be shared by the VirtualBox's OS. pretty nice idea right?
- VirtualBox always create a virtual disk(usually of 8GB size) of your entire OS. So that, you can easily port the entire OS to other machines too using VirtualBox.
Every coins give us either head or tail. Likewise VirtualBox have the following dis-advantages too:
- Speed is pretty low as compared to "real installation". If you are using a higher-end computer, you can fill this gap.
- The OS libraries (from Host's OS and VirtualBox OS) clash sometimes, especially when we search or cracking the libraries. Changing the VirtualBox disk from the primary partition help to prevent this issue.
- you can not use all the ports which available in the Host PC to VirtualBox.
So, it's totally up-to the user to select the OS installation(but Linux is must,mind it :) ).
How I can Install the VirtualBox?
VirtualBox is free(hope always...) and you can easily download it from the following site.
Select a suitable one(in our case, Windows 7 .exe file) and follow the instructions. It's pretty easy to install so that, I'm not given the steps over here. Once you installed the VirtualBox, then follow the below steps to install the Ubuntu in Windows 7, using VirtualBox.
Configuring the VirtualBox with new Virtual Disk
After the "sucessful" installation, double click on the Oracle VM virtualBox icon. This will open a typical Oracle VM VirtualBox manager window.
2.

Click on the "New" button of Oracle VM Virtual Manager window.
3.

This will open another window. Click next button.
4.

A option window with VM Name and OS type appeared. Here you should give the name of your VirtualBox OS and type of your OS. In our case, I given the name as "Ubuntu 12.04" and operating System as Linux. Version you can select as Ubuntu from the drop down menu. after completing the fileds, cleck next button.
5.

This step is pretty tricky. most of the people don't know how to select the Memory for their needs. Well, for better result, take the default setup which appeared on this window first. You should allocate 1/4th of the actual RAM size of your Host PC. That means if you have a RAM with 2GB of size, you should allocate the VirtualBox memory as 512MB only. In otherwords, if you want to allocate Memory as 1GB in VirtualBox, then you should have a 4GB RAM in your Host PC.
Click next,once you decided with the suitable memory.
6.
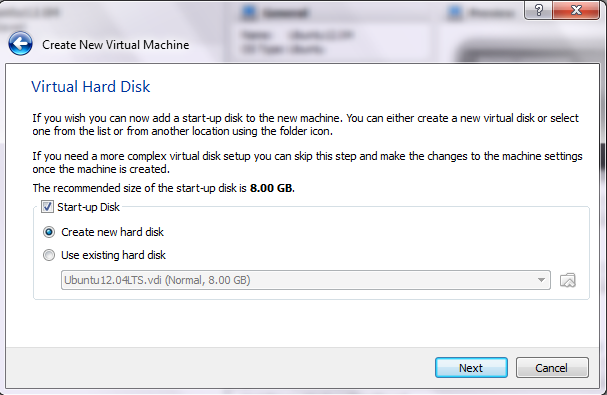
If you are going to make the VirtualBox OS at first time, then click on the Start-up Disk option. Select "Create new hard disk" Click next.
7.

Select the first option, "VDI(Virtual Disk Image)" as file type and click next. This will help you to create a new Virtual Disk.
8.

The next option is to select the type of allocation. In our case, I would prefer the second option, "Fixed size". Though fixed size allocation method takes time, this is a best method to avoids frequent system crashes.More over, we trying to perform our skills on this OS! so chances for the system crash is obvious :)
Click next after you select the second option.
9.

The next window open with Location and size(again size? oh no...). Well in this window, you can enter the particular location where the virtual disk has to be stored. The size of your virtual disk should be mention next. usually it will be of 8GB, but you can change it.
Click next, after you select the proper filed entries.
10.
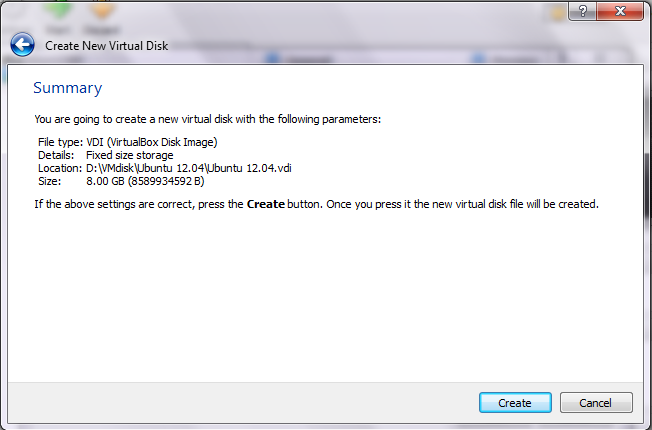
Oh my God, its over!. The next window will show the summary of what and all changes we did in VirtualBox settings. Verify it and click on Create button. This will Start creating the virtual disk. you will get the following window, which shows the progress. wait till it completes.

11.
This create the virtual disk in the specified path. Be sure to look at the path to confirm the disk presence(where else it will go? :p).If everything is perfect, then the Oracle VM VirtualBox Manager window shown the name of the disk as below.

Yippee we completed the first step successfully!
Installing a new OS to VirtualBox
The following steps demonstrate how you can install the Ubuntu 12.04 in VirtualBox.
- Download the ubuntu-12.04-desktop-i386.iso image from the Ubuntu website(downloading details given in the Ubuntu site, http://www.ubuntu.com/download/desktop itself).
2.

Click on the settings button next to the new button which shown in the 11th step of virtual disk creation. This will pop up a new window as above. Click on storage on left side. Select the IDE --> Empty. Click on the small folder/CD image next to the CD/DVD driver attribute on the right end.
3. Select the path in which Ubuntu .iso file is downloaded. Then the above window modified a s below

Click on Ok button. This will show the Manager widow with an additional start option! next to settings

Select the Ubuntu and click on "Start" button. This will start the Ubuntu first time configuration. This step is same as that of normal installation. Check out the following link for more information regarding the instalation
Wait for the boot-up and finish the regular installation procedure. If everything goes well, then our Ubuntu will be invoke after that

Yes..Our second step also made successfully! Now it's your turn...try what ever you want in Linux...enjoy the world of Open Source....
4.

Once you click on the close button of the window, the VirtualBox gives a prompt with 3 options. It's up-to the user to select the suitable option according to the need. Once the option is selected, click OK.
this will do the selected option and returned to the Oracle VM VirtualBox Manager window.

Happy coding...Happy life....
T25RSS2ZMMA5
No comments:
Post a Comment